11 Poses That Construct Full-Physique Energy
“], “filter”: { “nextExceptions”: “img, blockquote, div”, “nextContainsExceptions”: “img, blockquote, a.btn, a.o-button”} }”>
Heading out the door? Learn this text on the brand new Outdoors+ app out there now on iOS gadgets for members!
>”,”identify”:”in-content-cta”,”kind”:”hyperlink”}}”>Obtain the app.
Yoga is usually misunderstood as a follow that solely helps you grow to be extra versatile or, if you’ll, flexible. It’s additionally an underestimation of what it may do for you. Nevertheless it’s additionally true that it may aid you expertise vital energy positive factors, notably within the smaller muscle tissues which might be simply missed in gymnasium exercises. Practising widespread yoga for energy poses challenges these muscle tissues and never solely will increase stability all through your physique however helps stop aches and strains from these muscle tissues being overworked.
The next yoga for energy follow helps full-body energy with out requiring you to go to the gymnasium or work with exterior weights.
11 Methods to Follow Yoga for Power
Depend on the next poses as a sequence or incorporate just a few of them into your common gymnasium exercise.

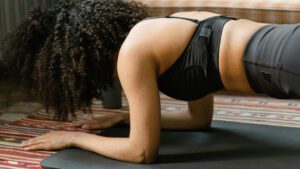
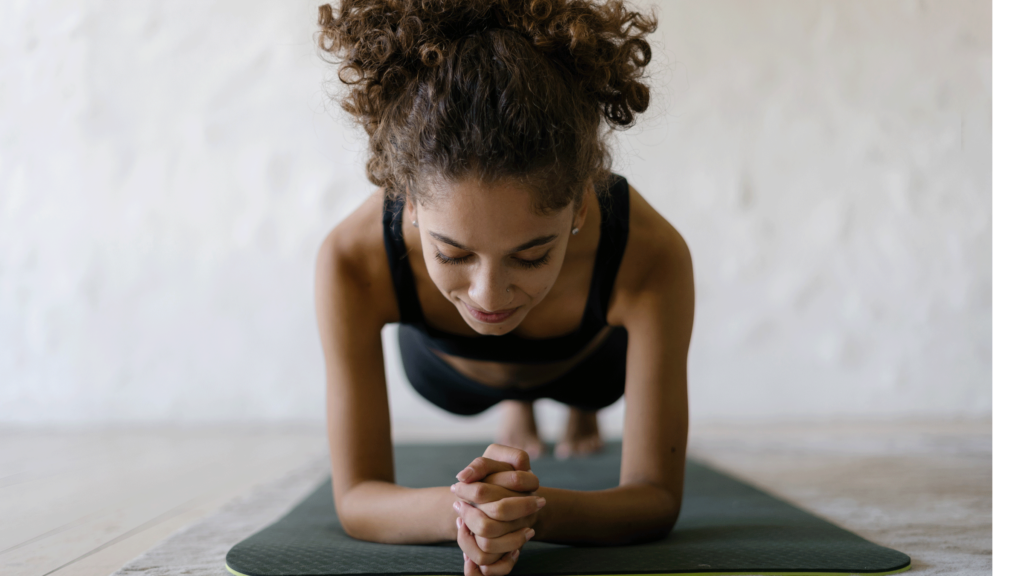
1. Forearm Plank
Begin in your fingers and knees and decrease your elbows to the ground, inserting them shoulder-width aside. Interlace your fingers and tuck your backside pinky finger so it doesn’t get squished. Press via the size of your forearms to the bottom of your wrists. Maintain your toes tucked as you straighten one leg at a time and maintain your self parallel to the ground in Forearm Plank. Draw your navel towards your backbone and push via your heels as you focus in your breath. Gaze barely ahead and down towards your thumbs. Breathe right here for 1 minute or longer.

2. Forearm Aspect Plank
From Forearm Plank, maintain the identical engagement as you slowly lean onto your left forearm, urgent down firmly out of your elbow to your wrist. You may place your forearm at a diagonal for steadiness. Maintain your palm flat on the mat or make a fist. Slowly roll onto the outer fringe of your left foot and maintain your toes staggered on the mat or stack your proper foot atop your left. Hug your legs collectively and use your core for help to stability on this pose. Relaxation your prime hand in your prime hip or slowly attain it towards the ceiling. Keep for five to 10 deep breaths.
Slowly transition via Forearm Plank after which repeat on the precise aspect.

3. Dolphin Pose
From Forearm Plank, begin to stroll your toes towards your fingers. Dolphin is rather like Down Canine besides you’re in your elbows as an alternative of your fingers. In case your hamstrings are tight, bend your knees and don’t fear in case your heels don’t contact the ground. Maintain your toes and legs hip-distance aside and stare upon your toes. Press down and ahead along with your forearms as you carry your shoulders towards the ceiling and your chest towards your thighs. Keep right here for five breaths.
Decrease onto your knees to relaxation.

4. Chair Pose on Tiptoes
Come to face on the prime of the mat along with your toes hip-width aside. Ensure that your toes are parallel. Carry your arms straight in entrance of you at shoulder top along with your palms going through one another or the mat. On an inhalation, carry your coronary heart; on an exhalation, bend your knees and shift your hips again in house, as in the event you have been going to take a seat again in Chair Pose. Carry your navel towards your backbone and maintain your breath even and easy. Maintain this place as greatest you possibly can and start to carry your heels off the ground to stability in your toes. (When you have any toe points, maintain your toes flat on the ground.) Breathe right here so long as you possibly can earlier than decreasing your heels and straightening your legs.

5. Tree Pose
Stand tall on the prime of the mat. Shift your weight into your left foot and draw your proper knee towards your chest. Maintain your proper ankle along with your proper hand and place your foot in opposition to your higher internal left thigh, just under your knee or in opposition to your ankle in Tree Pose. Press your higher left leg in opposition to your foot and your foot in opposition to your leg. Attempt to maintain your hips stage to the ground, ensuring one hip isn’t larger than the opposite. Carry your fingers to Prayer Pose in entrance of your chest. Maintain your gaze, or drishti, targeted straight forward on a single level in entrance of you. Keep right here or elevate your arms overhead, preserving your fingers shoulder-width distance, and unfold your fingers huge, reaching your fingertips towards the ceiling. Breathe evenly right here. In the event you really feel regular, attempt closing your eyes. Launch the pose after 5 to 10 breaths. Change sides.

6. Goddess Pose
Face the lengthy aspect of the mat and take a large stance along with your toes 3 to 4 toes aside. The taller you’re, the broader you’ll need your stance. Angle each toes out about 45 levels after which bend your knees, ensuring your knees are pointing towards your toes. (Don’t let your knees collapse inward or outward.) Stack your knees over your heels and carry via your low stomach, ensuring your torso is upright. Place your fingers in Prayer Pose in entrance of your chest and keep right here for 1 minute or longer. Discover in case your decrease again is arching and, in that case, draw your navel to your spin to appropriate that.

7. Excessive Lunge
From the highest of your mat, take an enormous step again along with your proper foot. Maintain your hips and shoulders squared ahead towards the entrance of the mat. Your stance ought to be lengthy sufficient that your entrance leg is at roughly a 90-degree angle. Stack your knee on prime of your ankle and level the middle of your entrance knee towards the second toe of that foot. Carry your decrease stomach away from the entrance of your entrance leg and maintain your chest perpendicular to the ground as you attain your arms alongside your head in Excessive Lunge. Press your again heel towards the wall behind you, carry your internal again thigh towards the ceiling, and check out to not collapse in your decrease again. On an inhalation, push down along with your entrance foot, straightening your entrance leg. On an exhalation, come again to the bent leg place. Repeat, shifting along with your breath, 5 to 10 occasions earlier than switching sides.
Variation: When you have a block helpful, maintain it between your fingers as you carry your fingers overhead. The block ought to be in its widest place. Squeeze your fingers on the block and picture you’re attempting to carry it towards the ceiling.

8. Squat
Stand in the midst of your mat going through the quick edge along with your toes about as huge because the mat and angled outward as they have been in Goddess. Bend your knees as a lot as you possibly can and maintain them pointing in the identical route as your toes in a Squat. Carry your fingers to Prayer Pose in entrance of your chest. In case your heels are lifted off the mat, both roll the again of the mat and relaxation your heels on that or deliver your fingers to the mat in entrance of you for help.

9. Crow Pose
From Squat, stroll your fingers ahead towards the quick aspect of the mat and start to spherical your backbone. Begin to carry your hips however maintain your heels on the mat. Maintain the rounding in your again and convey your fingers in considerably in order that they’re about 12 inches in entrance of your toes. Separate your fingers shoulder-width distance aside and unfold your fingers huge. Shift your gaze ahead and down and bend your elbows barely, as in the event you have been beginning to come into Chaturanga or Low Push-Up. Place your knees on the backs of your higher arms, as if the arms have been a shelf, and maintain hugging your fingertips into the mat. Begin to lean your weight ahead and are available onto the balls of your toes after which your toes. Maintain your chest and gaze going through ahead and proceed to push firmly down with each fingers. Proceed to slowly shift your weight ahead and carry one or each toes off the mat. Whenever you’re balancing in your fingers, carry one or each heels towards your hips. If each toes are lifted, draw your massive toes to the touch in Crow Pose. Breathe right here after which slowly launch.

10. L-Pose
Make your option to a wall and are available onto your fingers and knees, going through away from the wall, along with your toes tucked underneath touching the wall. Your hips will likely be over your knees, your shoulders stacked over your wrists, and your fingers shoulder distance aside. Unfold your fingers huge and press down into each fingers, particularly urgent down along with your thumb and index fingers, then begin to carry your hips up. (It is going to really feel such as you’re shifting into a brief Down Canine.)
Maintain your fingers grounded and arms straight and begin to stroll your toes up the wall. Carry your toes as much as hip top and no larger. Bend your knees barely and press your chest towards the wall. In case your hamstrings are open sufficient to straighten your legs, be at liberty to do this right here. Nonetheless, in the event you attempt to straighten your legs and it pushes your chest ahead, maintain your knees barely bent. Proceed to press firmly down with each fingers and maintain your arms straight as you gaze towards the wall. Keep right here for just a few breaths after which stroll your toes down the wall and relaxation in your knees.

11. Handstand
This can be a exhausting pose, particularly in the event you’re new to it, so attempt to have a constructive strategy and know that you just’re doing all of your physique plenty of good, even when it takes some time to rise up.
Come onto your fingers and knees going through a wall, along with your fingers about one full hand size away from the wall. Line up your fingers in order that they’re shoulder-width distance aside and make it a little bit wider in case your shoulders really feel tight. Unfold your fingers huge, urgent firmly down into each fingers. Shift your gaze ahead to the house between your thumbs and maintain your gaze there. Really feel your outer higher arms firming in and maintain your arms straight and robust as you tuck your toes underneath and carry your hips. You’ll really feel such as you’re in a brief Down Canine. From right here, step or kick up in Handstand. Don’t fear in the event you don’t get all the way in which up at first; it takes follow! When you’re up, deliver your heels collectively and attain them towards the ceiling, preserving your gaze between your thumbs the whole time.
RELATED: 5 Power-Constructing Yoga Poses for Rookies
This text has been up to date. Initially printed February 14, 2019.